Click play below to listen to a routine that will help expand vocabulary in your classroom.
If you’re looking for a more effective way to help your students expand their vocabulary—without relying on endless word lists—this episode is for you! Today, we’re diving into morphology instruction and how a simple five-step routine can transform the way your students learn new words. By teaching morphemes explicitly, you can give your students the tools to decode unfamiliar words, make meaning independently, and support them in expanding vocabulary in a meaningful, lasting way.
Teaching morphemes is one of the most powerful strategies for helping students recognize word patterns, determine word meanings, and build a stronger understanding of language. But if you’ve ever felt like you didn’t have enough time in the day to fit in meaningful word study, or if you’ve relied on worksheets and memorization without seeing long-term retention, this episode will show you a more effective approach to expanding vocabulary in your classroom.
In this episode, I’ll walk you through a structured, step-by-step approach to teaching morphemes that will help students recognize word patterns, build connections, and focus on expanding vocabulary across all subject areas. This strategy works for all students but is especially powerful for upper elementary learners tackling complex texts.
By the end of this episode, you’ll have a simple and effective plan for incorporating morphology into your literacy block—without adding more memorization or worksheets! Whether you’re new to morphology instruction or looking for ways to refine your approach, you’ll walk away with actionable strategies to support your students in expanding vocabulary in a way that truly sticks.
In this episode on expanding vocabulary without more word lists, I share:
- Why morphology instruction is a game-changer for vocabulary development
- A simple five-step routine to explicitly teach morphemes in your classroom
- How understanding prefixes, suffixes, and roots helps students decode unfamiliar words
- Practical strategies to help students recognize word patterns and build connections
- How to make word study more engaging, meaningful, and effective for upper elementary students
Resources:
- List of the Most Common Prefixes and Suffixes Freebie
- Join The Stellar Literacy Collective
- Sign up for my Private Podcast: Confident Writer Systems Series
- Sign up for my FREE Revision Made Easy email series
- If you’re enjoying this podcast, please leave a review on Apple Podcasts!
Related Episodes and Blog Posts:
- Episode 223, Help Your Students Develop A Robust Vocabulary With These 4 Engaging Strategies
- Episode 211, What Is Morphology and How Do I Teach It?
- Episode 204, 4 Ways to Enhance Your Vocabulary Instruction
Connect with me:
- Join my newsletter
- Shop my TPT store here
- Instagram: @thestellarteachercompany
- Facebook: The Stellar Teacher Company
More About Stellar Teacher Podcast:
Welcome to the Stellar Teacher Podcast! We believe teaching literacy is a skill. It takes a lot of time, practice, and effort to be good at it. This podcast will show you how to level up your literacy instruction and make a massive impact on your students, all while having a little fun!
Your host, Sara Marye, is a literacy specialist passionate about helping elementary teachers around the world pass on their love of reading to their students. She has over a decade of experience working as a classroom teacher and school administrator. Sara has made it her mission to create high-quality, no-fluff resources and lesson ideas that are both meaningful and engaging for young readers.
Each week, Sara and her guests will share their knowledge, tips, and tricks so that you can feel confident in your ability to transform your students into life-long readers.
Tune in on your favorite podcast platform: Apple, Google, Amazon, Spotify, Castbox, and more! If you’re loving this podcast, please rate, review, and follow!
Podcast (stellar-teacher-podcast): Play in new window | Download
Today, we’re diving into one of my absolute favorite topics. Any guesses on what it is? Morphology! Specifically, I’m going to share a simple five-step routine you can use to explicitly teach morphemes in your classroom. Now, if you’ve ever felt like there’s not enough time in the day to teach morphology in a way that actually sticks, or if you’ve ever wondered how to help your students expand their word knowledge, this episode is for you. Let’s get started.
Hey there, stellar teacher! Welcome back. Now, as a self-proclaimed word nerd, I’m excited for today’s episode because we are talking about morphology—and really, how we can get more strategic and explicit with this very important word study topic.
So let’s start by talking about why teaching morphemes matters. But before we do that, let’s make sure we’re all on the same page and define what a morpheme is. Now, this is one of those terms that scared me when I first started learning about the science of reading because I was like, What is a morpheme? What is morphology? I kept hearing how important it is, especially in the upper grades, and of course, I was worried that I had missed out on teaching my students something so critical to their literacy success.
So if that’s you—or if that’s ever been you—have no fear. My guess is that you’re probably already doing something with morphemes in your classroom. That’s because a morpheme is the smallest unit of meaning in a word, and they are included in most state standards, which means you’re likely already teaching them in some capacity.
For example, let’s look at the word unhelpful. It has three morphemes: the prefix un- (which means not), the base word help, and the suffix -ful (meaning full of). Each of these morphemes carries meaning, and when students learn to recognize them, it can really help them determine the meaning of new words—without having to rely on a dictionary, the teacher’s definition, or memorization.
Now, let’s back up and talk about why it’s so important to teach morphemes. We know that vocabulary and comprehension are deeply connected. In fact, research tells us that students need to understand about 95% of the words in a text to fully comprehend it. That’s a lot of words—especially when you think about the novels or articles that students read. Upper elementary students are tackling some long and complex texts!
And here’s the challenge: by the time students reach upper elementary, they need to have a massive personal vocabulary—a lexicon filled with tens of thousands, if not hundreds of thousands, or even millions of words—in order to read and understand most complex texts. But as teachers, we don’t have time to explicitly teach every single word in isolation that our students will encounter.
This is where morphology instruction comes in. When students develop a strong understanding of prefixes, suffixes, and roots, they have the tools to unlock hundreds of words at a time instead of memorizing them one by one. This means that students will be able to decode and read unfamiliar words more easily. It also means they can determine word meanings independently when they come across unfamiliar words in a text. Plus, morphology helps them transfer their word knowledge across a variety of academic texts and settings.
So morphology isn’t just beneficial for reading—it’s going to help your students succeed in subjects like math, science, and social studies as well. That’s why we definitely want to be teaching morphemes to our students. But we also want to make sure we do it in a way that is effective and actually helps the knowledge stick. We don’t just want to teach morphemes for the sake of teaching them—we want our students to truly understand and remember them.
Now, when I reflect back on how I handled morphemes, prefixes, suffixes, and roots in my fourth-grade classroom, I realize I could have made some improvements. Honestly, I wish I could go back and do my whole teaching experience all over again. When I was in the classroom, I would introduce the idea of a prefix, suffix, or root to my students, and I would introduce some of them individually. But for the most part, we focused on learning the definitions of the morphemes—basically memorizing them. Here’s this list of morphemes. Here are their definitions. And we did a lot of worksheet practice.
Now, that’s not necessarily bad, but there are definitely more effective ways to approach it. I also remember creating a lot of those cute interactive journal entries—the ones that required a ton of cutting, gluing, and coloring. And while they looked adorable when they were finished, they didn’t really help students remember the morphemes. That’s why I wish I had taken a different approach to help my students truly understand and retain morphemes.
I really wish I had known about the five-step routine I’m about to share with you because it would have made my morphology instruction so much more effective. I wouldn’t have wasted so much time on what I now realize was morphological busywork. So let’s talk about an easy five-step routine that you can start using today.
This routine makes explicit morphology instruction simple and structured, and it gives students repeated opportunities to engage with new morphemes in meaningful ways. This repeated exposure will help the morphemes really stick in their brains—so they’ll be able to remember and apply them when they’re reading on their own.
Here’s what it looks like. You can do all five steps on the same day, or if you’re crunched for time, you can break them up over a few days.
Step one is to introduce the morpheme. You’re going to start by directly teaching the morpheme. For example, if you’re introducing the prefix un-, you might say something like, “The prefix un- means ‘not’ or ‘opposite of.'” You want to keep your introduction brief, clear, and direct so that students immediately understand the morpheme’s meaning.
Inside The Stellar Literacy Collective, we have a set of lessons that introduce common morphemes. When teachers introduce a new morpheme, we also provide a Google Slide or an anchor chart that includes the morpheme, its definition, and an icon to serve as a visual cue—helping students better remember the meaning.
When introducing a morpheme, you might also want to give students an anchor word. Instead of just saying un- means not or opposite of, you could introduce the word unhappy. This gives students a concrete example to help them remember the meaning of the morpheme.
The next step is to provide examples that include the morpheme. If un- is the morpheme you’re teaching, you might give students a list of words such as unhappy, unfinished, unfair. Seeing the morpheme in different words helps students begin to recognize patterns and understand how the meaning extends across multiple words.
When sharing these examples, it can be helpful to write them on the board, display them on a slide, or use an anchor chart so students can see the words rather than just hear them. You can highlight the morpheme in a different color or break apart the word to show its structure. For example, you might write un- plus happy equals unhappy, or un- plus finished plus -ed equals unfinished. Breaking words apart in this way helps students become more aware of morphemes and teaches them how to break down words when they encounter them in their reading.
Now, step number three is a step that many teachers forget, and sometimes you might not be able to do this step. But if you can, it’s really helpful, and that is to share non-examples. You want to show students words that contain the same letters as the morpheme but don’t actually contain the morpheme itself—words that might confuse students. For example, if you’re teaching the prefix un-, you might show them the words uncle or under. Both start with the letters u-n, but they aren’t examples of the morpheme because, in these words, un- does not carry the meaning not or opposite of.
Sharing non-examples can be really helpful for students to recognize that a morpheme is not just about spelling—it’s about meaning. Un- must actually mean not or opposite of in order for it to be a morpheme. We like to call these types of prefixes “imposter prefixes,” and the same can be true for imposter roots or suffixes. Keep in mind that not every morpheme has a non-example, but if there are similar-looking words that might confuse students, it’s a good idea to share them so they can be aware of the distinction.
Step number four is where you give your students a chance to build and define words using the morpheme you just taught them. So with the prefix un-, you could give them a list of base words and have them create words using un- plus the words you provided. When giving students words to build with the morpheme, it can be really helpful to include words that work with the prefix un-, but also words that do not. It’s important for students to recognize that un- cannot be added to every single base word to create a new word.
For example, if a student builds the word untrustworthy, they should be able to recognize that un- means not and then define untrustworthy as not trustworthy, even if they’ve never seen that word before. Building and defining words helps students practice applying their morpheme knowledge. It also encourages them to analyze words they encounter and determine their meanings based on their understanding of morphemes.
Okay, step number five is to contextualize. The last thing we need to do is help students see morphemes in real reading and writing situations. Too often, morpheme instruction stops at the word level. I definitely did a lot of this in my classroom—doing great activities with building words, sorting words, and breaking words down. And while all of that is important, if we stop there and only ever give students exposure to morphemes at the word level, they may struggle to recognize and apply their morphological knowledge when they encounter these morphemes in actual texts.
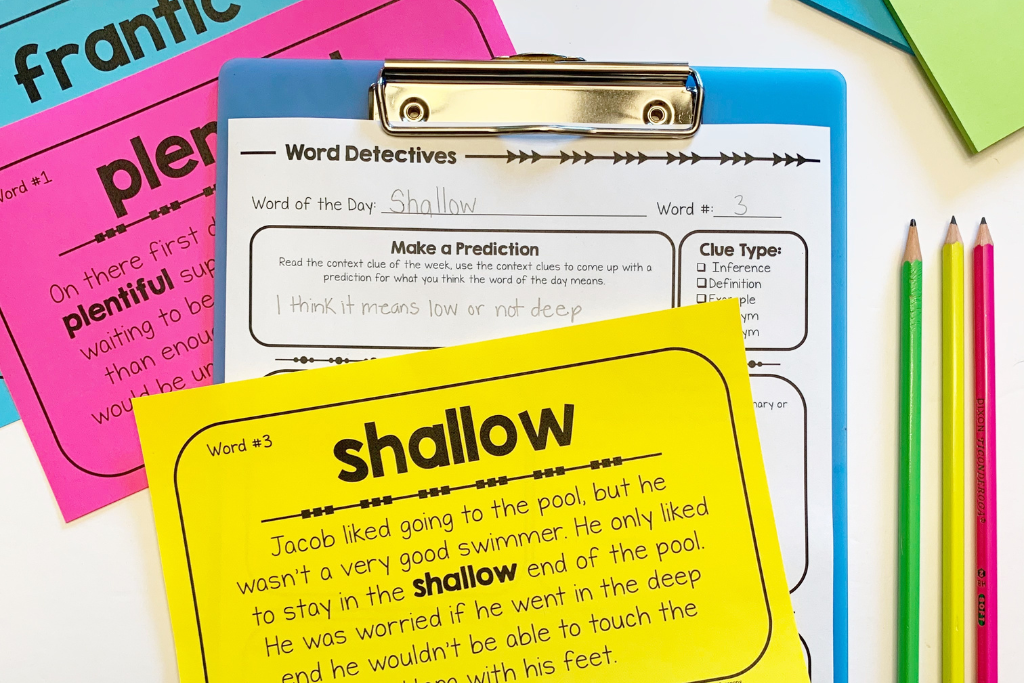
Ultimately, our goal is for students to see and use their morpheme knowledge in context, so we need to be intentional about bridging that gap. One way to do this is to start with simple sentences. Show students a sentence that includes a word with the morpheme you’re introducing. This helps them see how the morpheme functions in everyday language. For example, if you’re teaching the prefix un-, you might show them the sentence: The instructions were unclear, so we had to ask for help. You can then discuss how unclear means not clear. Since the instructions were not clear, they had to ask for help.
The next level would be to use fill-in-the-blank sentences. Instead of giving students a sentence that already contains the morpheme, you give them a sentence where the word with the morpheme is missing, and they have to figure out what it is. For example, you might say: The weather forecast was ________, so we weren’t sure if we needed jackets. You can then ask your students, “What word could fit in that blank that has the prefix un-?” A possible answer would be uncertain: The weather forecast was uncertain, so we weren’t sure if we needed jackets.
This step encourages students to actively apply their understanding of morpheme meanings. They have to search their own mental vocabularies and think critically about which word with the prefix un- would make sense in the sentence.
So then the next level is to provide short paragraphs with multiple examples. You could show students a short paragraph containing three or four words that use the morpheme, which gives them more exposure to how the morpheme appears in natural language. An example could be: The unfinished project sat on the desk. Mia felt uneasy about it because she knew her teacher would be unhappy if it wasn’t turned in on time.
If you want to take this to the next level, you could remove those words from the paragraph, give your students a word bank—or not. There are lots of ways to differentiate your morpheme practice. By taking these extra steps and going through all five steps I just shared, you ensure that students don’t just memorize morphemes in isolation but truly understand how they function in meaningful texts. This approach helps morphemes stick and ensures that students can apply their morpheme knowledge in reading, writing, and beyond.
Okay, so if you’re not putting these five steps into practice yet, make a plan to start now. One of the questions I often hear from teachers is whether explicitly teaching individual vocabulary words—like before a read-aloud—is enough, or if they also need to explicitly teach morphemes. How are these two things different? If they’re already teaching vocabulary words, does that count? Should they focus on individual morphemes instead of vocabulary words? How do they work together? Let’s talk about that.
When we explicitly teach individual vocabulary words, we typically select them based on the texts students are reading—whether in science, social studies, a chapter book, or an article—and we pre-teach certain words to support comprehension before students begin reading. With explicit morpheme instruction, you don’t necessarily have to teach individual morphemes within the context of a read-aloud. Instead, you should have a dedicated part of your literacy block for word study instruction, where you explicitly teach morphemes.
In upper elementary, if you have a 90-minute literacy block, you should try to carve out 15 to 20 minutes a day for word study instruction, which includes teaching morphemes. Your school might have a list of prefixes, suffixes, and roots they want you to teach. Many states provide suggested grade-level lists. But if not, and you’re left to decide on your own, you might wonder: How do I choose which prefixes, suffixes, and roots to teach my students?
My recommendation is always to start with the most frequent morphemes. For example, the prefix un- appears in 26% of all words that contain prefixes. That’s far more common than the prefix fore-, which appears in only 3% of words with prefixes. Some prefixes appear in fewer than 1% of words. The point is that if your lessons focus on the most common morphemes, you’ll get more bang for your buck. You won’t have to teach as many morphemes in isolation because your students will already recognize most of the ones they encounter.
If you teach the 20 most common prefixes and suffixes, your students will have knowledge of the most frequent affixes, which cover 97% of all words that have affixes. I think that’s pretty cool!
If you’re looking for a list of the most common prefixes and suffixes, we have one we’d love to share with you. You can grab it at stellarteacher.com/prefix, and we’ll link to it in the show notes as well.
Now, before we wrap this up, let me share a few bonus tips to help you reinforce morphology in your classroom. Once you’ve gone through the five-step process and introduced morphemes to your students, you want to continue reminding them of all the morphemes you’ve taught.
One way to do this is by giving your students hands-on practice. You can try activities like a word ladder, where students add or remove morphemes to change the meaning of a list of words. You could give them a word matrix, where they combine roots, prefixes, and suffixes to create as many different words as possible. You could also have them do word sorts, where they categorize words based on different morpheme patterns. All of these activities reinforce students’ knowledge and understanding of morphemes.
Another great strategy—and one that I love encouraging teachers to implement—is to help students become word watchers. This idea comes from a book by Wiley Blevins, and I mention it in almost every podcast episode I do on word study. It’s about creating an environment where students notice words. Once you’ve taught a morpheme, challenge your students to find words with that morpheme in the texts they’re reading. Encourage them to be on the lookout for morphemes in independent reading, in math, science, and social studies, on bulletin boards, or even while driving home. The more they see morphemes in context, the better they will understand and retain them. So, constantly encourage your students to become word watchers, with a special focus on morphemes.
Okay, friends, I hope this episode gave you a simple and effective routine for teaching morphemes in your classroom. Quick reminder—if you’re an SLC member, our word study lessons already incorporate these five steps. So if you haven’t started using them yet, log in and check them out! We have lessons for prefixes, suffixes, and roots. And if you’re not an SLC member, doors are open, and we’d love to have you join our community. You can always learn more at stellarteacher.com/join.
And of course, if you enjoyed this episode, please share it with a fellow teacher! Send it in a quick text, email it to your team, or post about it on Instagram. Word of mouth is always the best way to help more teachers discover this podcast. Thank you for listening, and I’ll see you back here next week.
Thanks so much for joining me today. If you enjoyed this episode and find value in this podcast, it would mean the world to me if you subscribed and left a five-star positive review. This helps me spread the word to more and more teachers just like you. Don’t forget to join me over on Instagram @thestellarteachercompany, and you can also find links and resources from this episode in the show notes at stellarteacher.com. I’ll see you back here next week!


Leave a Comment
You must be logged in to post a comment.